528
AOMEI OneKey Recovery 2019 full review
In 2014, AOMEI Technology released a freeware named AOMEI OneKey Recovery, before this, AOMEI Company has already developed a full-scale backup software: AOMEI Backupper. However, AOMEI OneKey Recovery is much more smaller and only supports system backup and restore.
For anyone who are not often to do backup or restore, or lazy users 😉, AOMEI OneKey Recovery is a better choice.
Download and install this free program from AOMEI official website, then run it on Windows operating system. I stressed Windows because it only supports Windows PC, including the latest Windows 10, Windows 8.1/8, Windows 7, Vista and Windows XP (all editions, both 32-bit and 64-bit).
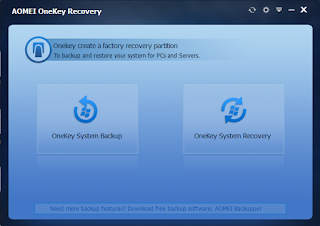
Open the program, you can see the clear and very cool interface, deep blue, only two buttons. Left is backup button, the right is recovery.
Notice that its name is AOMEI OneKey Recovery, when restore, you only need one click. But first you should do backup, which need you spend some time to set first. Click the left backup button, you will go to the next step: Select save the image file to where. If you choose the first option, it will create an AOMEI OneKey Recovery Partition automatically.
When your computer need to restore to previous normal state because of something wrong or disaster happens, you should only press “A” on the keyboard during the process of system startup. This is what OneKey Recovery meaning.
Of course, you can restore your computer to its factory default or a previously backed up state under Windows explorer, just click the right OneKey System Recovery button to continue. There are two ways as well, one is restoring system via loading the image file in AOMEI OneKey Recovery Partition: this function let you restore image file that stores in recovery partition to C drive. Another is restoring system by selecting a system image file: you should find image file that stores in the other location then restore it.
In this article, I’d like to tell you a special way if you choose the first option: Recover system via Window PE. Following are the steps:
Step 1: For the traditional BIOS system, at the beginning of power up, hit the letter A on the keyboard or select a Windows boot menu to start AOMEI OneKey Windows PE environment.
For EFI/UEFI based system, the keyboard function cannot be supported, so you can only choose “Enter into AOMEI OneKey Recovery” in the Windows boot menu to start the Windows PE environment.
Step 2: After you enter the Windows PE environment, AOMEI OneKey Recovery will be opened automatically, you can easily use it to restore your system.
There are somethings should be noted:
AOMEI OneKey Recovery does not supported to restore a system backup based on GPT to MBR disk and vice versa so far.
If you plan to restore to other location, make sure there are enough free space otherwise you must remove some useless files to free up the space.
Some tips for using AOMEI OneKey Recovery
If you have used AOMEI OneKey Recovery to create recovery partition before, second or subsequent times, you can directly click “Start Backup” to begin, since the program will directly backup your system to AOMEI Recovery Partition. To check the changes, please click Details button to see more.
For EFI/UEFI based system: The application only supports entering into AOMEI recovery environment by selecting a menu item, does not support for pressing the A key to enter into the recovery environment. You can either enable or disable the menu item and change the counting time of AOMEI boot menu by clicking the up and down button. See picture below:
For traditional BIOS system: This tool supports pressing the A key to enter into AOMEI recovery environment to do system restore, also supports adding a menu item into Windows Boot Manager. You can configure it as the following picture:
To get more knowledge about AOMEI OneKey Recovery and its advanced editions, hope you could visit AOMEI official website.


